Using Vi/Vim

Vi and Vim are ultimately the same thing. Vim is just the improved version of Vi. Vi/Vim is a text editor that is used in PuTTY when using comet.

Vim is needed when running molecular dynamics simulations because it allows you to quickly edit files and check results in output files. But, Vim isn’t your average text editor. Since it is designed for software like PuTTY, it makes editing very easy. The easy editing and the ability to edit your files in any way makes Vim very powerful.

Vim has many commands that contribute to how powerful the text editor is. Some of the helpful commands in Vim are :wq, i, u, G, gg, and :help cmd. Command, :wq, saves all the edits you have done to the file. Command, i, enables insert mode, which allows you to insert and delete things. Command, u, undoes previous action. Command, G, moves to the  end of the file. Command, gg, moves to the beginning of the file. Command, :help cmd, gives you help about whatever cmd is. cmd can be anything you need help with.

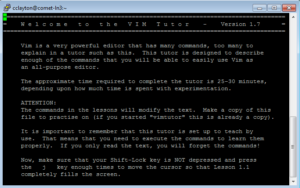
One amazing thing about Vim that is helpful and essential is vimtutor. Vimtutor is a multi-lesson tutorial on how to use and gives you important commands to use Vim. Each lesson have many parts to it. If you go through the entire tutorial, you will be about to effectively use Vim. There is a learning curve though. It takes a while to get use to, but after practice with Vim and using Vim, you’ll be a pro.

Vim

Above is the beginning of vimtutor.


1 Comment

Filed under computing

Python: Error Handling

One part of my updates to my Python script has been to manage what the script does in the case of incomplete output files. I have developed ways of circumventing a couple of issues, which include missing or different nstates values and incomplete files.

To get the number of states, I use a function to find the route line, and then I use a regular expression to extract the nstates value. The function that I use to find the route line can be seen in a previous post.

I use a simple regular expression to find the nstates value from the route line: nstatesRegex = re.compile(r"nstates=(\d*)")

An example of a route line, which the find_parameters function extracts, is as follows: # td=(nstates=6) cam-b3lyp/6-31+g(d) geom=connectivity

I use nstatesRegex to get the nstates value from that line, but sometimes the nstates value does not appear in the route line. My script does not work properly if the nstates is not specified in the route line of an output file. For now, my code just prints a message specifying any files that do not include an nstates value in the route line.

If an nstates value is different from the other nstates values, I need to compensate for missing values in the list that contains all the relevant data. I first loop through all the files to get the largest_nstates value. In the second loop of all the files in which I append the relevant data to the master_results list, I do the following after I append the energy values:

for x in xrange(nstates, largest_nstates):
      EE_lst.append(" ")
      abs_EE_lst.append(" ")
      osc_lst.append(" ")

The empty spaces account for empty cells, where the output file expects energy values. I extend my master_results list with those three lists. The empty spaces help each of these lists be the same length as the largest lists I find in the directory, so that the lists are a uniform length and can be iterated through more easily.

Sometimes a user may have incomplete output files in the directory. An easy way to verify that an output file is complete is to check if it has a job time. This method is imperfect, since I have recently encountered an error in Gaussian itself of an incomplete file that nonetheless included its job time up until it crashed. Checking the job time will at least ensure that all files have run to completion, whether or not they failed in Gaussian. On the latest version, my script fails when it tries to read an incomplete file, but it will print a message that tells the user which files did not have job times, so that the user knows which files to remove from the directory.

There are several updates that I can make on this script to help it deal with incomplete files. I could have it skip incomplete files (such as those without job times) instead of just printing a message about which files are incomplete, so that the script still reads all the complete files. Although I have made progress in dealing with files that have different numbers of states, I could set the default to 3 states (if that is indeed the default), when nstates is not specified in the route line. I could also have my script check for Gaussian error messages and inform the user of the error message and the pertinent file. These updates are meant to help the user more quickly identify problems and spend less time looking at the script and various output files to determine what went wrong in a failed run.

1 Comment

Filed under programming

Accessing and Using Comet

Comet is the super computer center in San Diego that I’m using to run molecular dynamics simulations. In order to use the super computer in San Diego on your local computer, you have to use a ssh client and a scp client. Since I am wirking on a Windows computer, the ssh client I used was PuTTY and the scp client I used was WinSCP. There are different programs to use on other operating systems. All you have to do is sign into your comet account on PuTTY and WinSCP, and you have access to the things in your comet account and the super computer.

The ssh client, PuTTY, is the program that allows you to communicate directly to the super computer. PuTTY on your local computer connects the remote computer, comet. When you are typing in and navigating PuTTY, you are typing in and navigating comet. The actual molecular dynamics simulations are done in PuTTY.

The scp client, WinSCP, is the program that allows you to transfer files from comet to your local computer. You can easily transfer files back and forth, from local to emote computer in a short period of time.

To learn how to use comet, I had to learn how to use PuTTY and WinSCP. Also, I needed to learn basic linux commands because in PuTTY you use linux commands to control comet. Linux commands like mkdir, cd, cp, mv, and ls are really essential and used a lot. mkdir creates a directory, cd changes the directory, cp copies files, mv moves files, and ls lists the files in the current directory. I think the nohup command followed by the & at the end of job was most useful so far because it allows jobs to run in the background without hanging up. This allows you to run other jobs or do other things without stopping the job. WinSCP can be used like any other file manager program, no linux commands needed.

An example of the nohup command to run a trajectory:
nohup mpirun -np 4 sander.MPI -O -i mdin -p 3beq.top -c 3beq.crd -r 3beq_md.crd -x md.trj -o md.out &

Comet allows me access to AMBER, which lets me use tleap, sander, and cpptraj. Those are programs are essential to running molecular dynamics.

PuTTY and WinSCP

Comet is the black screen on the left and WinSCP is the left screen.

2 Comments

Filed under computing

Molecular Dynamics Simulation Process and AMBER

I learned the Molecular Dynamics Simulation process by dealing with the protein Influenza Neuraminidase 3BEQ. Molecular Dynamics Simulation is a multi-step process.

First, I had to visit the protein data bank to download the protein Influenza Neuraminidase and put in a directory on comet. Second, I had to setup the protein in tleap in AMBER. While I set up the protein in tleap, I had to add Ions to the protein and solvate the system with a water box. Third, you have to save the protein in a coordinate and topology file. Fourth,  I needed to run energy minimizations using sander in AMBER. Fifth, I then needed to run equilibration. Sixth, I had to run a molecular dynamics run. Seventh, I had to use cpptraj to run a trajectory analysis. Lastly, I used VMD to view the simulation.

The process is tedious and allows a lot of place for error and typos, which could be annoying. Aside for the errors that could take place, the molecular dynamics simulation process is not too bad to handle with guidance.


2 Comments

Filed under chemistry

Different Basis Sets for Gaussian Calculations

There are multiple types of functionals and basis sets that can be used for different calculations in Gaussian such as optimizations, scans, and excited state energy calculations. A basis set is a set of basis functions. Each basis set is a different size and generally, the bigger the basis set size, the more accurate the results will be. The names of the basis sets accessible through Gaussian are 6-31G (which can include +,++, and different orbitals), STO-3G, 3-21G, 6-311G, cc-pVDZ, cc-pVTZ, cc-pVQZ, LanL2DZ, LanL2MB, SDD, DGDZVP, DGDZVP2, DGTZVP, GEN, and GENECP. However, really there are many more options available which are discussed more thoroughly on the following website (http://www.gaussian.com/g_tech/g_ur/m_basis_sets.htm). It is also possible to create your own basis set using Gaussian, but this can be time-consuming and complicated. In relation to 6-31G, the increasing size of the basis set in terms of +, ++, aug- (which are augmented basis sets)  and p,d,f orbitals or *,** (polarization functions), the more that are included, the more accurate results these should be as well. Each basis set contains a different number of Cartesian (etc) basis functions, which can be found in the output file (ctrl-f “basis function”). The larger the number of basis functions corresponds to a longer calculation time.

I performed an optimization calculation on a new conformation of tryptophan and then ran excited state calculations using 16 combinations of functionals (b3lyp, cam-b3lyp, pbepbe, and wb97xd) and basis sets (6-31G, 6-31+G, 6-31+G(d,p), and cc-pVDZ). Since 6-31G is the smallest basis set here, it took the shortest time to complete calculations in all of the functionals. Also, within functionals, cc-pVDZ is similar in time to 6-31G. Below is a table showing the times and number of basis functions for each basis set that was used in calculating excited state energies of an optimized configuration of tryptophan.

A) Basis set: 6-31G

Cartesian Basis functions: 159

Functional b3lyp cam-b3lyp PBEPBE wB97XD
Job CPU Time / Minutes 7.733 9.717 7.45 10.1


B) Basis set: 6-31+G

Cartesian Basis functions: 219

Functional b3lyp cam-b3lyp PBEPBE wB97XD
Job CPU Time / Minutes 25.88 34.63 20.5 34.65


C) Basis set: 6-31+G(d,p)

Cartesian Basis functions: 345

Functional b3lyp cam-b3lyp PBEPBE wB97XD
Job CPU Time / Minutes 59.53 76.0167 48.05 81.783


D) Basis set: cc-pvdz

Cartesian basis functions: 285

Functional b3lyp cam-b3lyp PBEPBE wB97XD
Job CPU Time / Minutes 29.0167 39.267 24.6 39.03


2 Comments

Filed under computing

Python Single-Point Geometry Energy Script Update

Continued from a previous post.

As I created my first completed version of the python script, I learned several things about python.

One thing I learned was how file handles work. With the function:

def find_parameters(file_handle):
    for l in file_handle:
         if l.startswith(" #"):
             return l.rstrip()

I was running into an error in which I received the message, Nonetype has no attribute…, meaning that my code was trying to use nothing as its input for functions that were looking for strings. That was after I looped through the file handle for a find function. I learned that looping through a file handle leaves the “cursor” at the end of the file handle, so that the very next use of the file handle would start at the end of the file handle. To reset the “cursor” at the beginning of the file handle, I need to call file_handle.seek(0) after each iteration, as follows:

def find_parameters(file_handle):
    file_handle.seek(0)
    for l in file_handle:
         if l.startswith(" #"):
             return l.rstrip()

Here is a Stack Overflow thread with an explanation.

Another thing I learned had to do with the difference between the .append() and .extend() functions. After some searching and consultation with Prof. Kennerly, I realized that that was because I called .extend() rather than .append(). I was trying to add a string as an item to an empty list, and the .extend() function treated the string itself as some sort of list. Using the .append() function instead kept the string as a string and simply added it as a value to the list. Here is a Stack Overflow thread with more discussion of the difference between .append() and .extend().

One more error that I do not understand but have since overcome has to do with Unicode. I had an interesting hour or so in which I got long text files of Sanskrit and other unexpected languages instead of my output data, when I opened my results text file in Wordpad. Other text editors, such as Microsoft Word, had no trouble reading the text files. I think that this error had something to do with the .extend() function, but I’m not sure. I recall that the error went away after I corrected my code to use .append() instead of .extend(), but that may not have been the direct source of the error. Further investigation of the Unicode issue is needed for a better understanding of it.

Often error messages may not describe the cause of the problem, but give clues of where the problem is. That is why many different error messages popped up when I had a more fundamental issue somewhere else in the script. In addition, as Prof. Kennerly says, computers always do what you tell them. So, the Sanskrit output made sense, given the code I wrote. To fix problems with the script, I needed more understanding of what certain functions did and how python and Wordpad read files.

I used IDLE on a Windows computer to edit and run my script.

P.S. WordPress is not good at allowing indentations or extra spaces. I have to use a keyword &+nbsp; (without the +) to create spaces in the text editor, and all instances of it disappear if I switch to the visual editor. I think this is an issue with HTML, and I read that I would have to use CSS to allow indents in WordPress. This is an annoying problem, and I am trying to get around it for future posts where I show snippets of code.

4 Comments

Filed under Uncategorized

Writing scripts to submit jobs on comet using the slurm queue manager

Comet is a huge cluster of thousands of computing nodes, and the queue manager software called “slurm” is what handles all the requests, directs each job to a specific node(s), and then lets you know when its done. In a prior post I showed the basic slurm commands to submit a job and check the queue.

You also need to write a special linux bash script that contains a bunch of slurm configurations, and also the linux commands to actually run your calculation.  This is easiest show by example, and I’ll show two:  one for a Gaussian job, and another for an AMBER job.


#!/bin/bash
#SBATCH -t 10:00:00
#SBATCH --job-name="gaussian"
#SBATCH --output="gaussian.%j.%N.out"
#SBATCH --partition=batch
#SBATCH --nodes=1
#SBATCH --ntasks-per-node=1
#SBATCH --export=ALL


nprocshared=1
jobfile=YOURINPUTFILE  #assumes you use a gjf extension (which is added below)
jobfile=$jobfile.gjf
outputfile=$jobfile.out

export GAUSS_SCRDIR=/scratch/$USER/$SLURM_JOBID
. /etc/profile.d/modules.sh
module load gaussian
exe=`which g09`
export OMP_NUM_THREADS=$nprocshared
/usr/bin/time $exe < $jobfile > $outputfile

If you copy this file exactly and then modify just the important parts, you can submit your own Gaussian jobs quickly.   But its worth knowing what these commands do.  All the SBATCH commands are slurm settings.  Most important is the line with the “t” flag which sets the wall time you think the job will require.  (“Wall time” means the same thing as “real time”, as if you were watching the clock on your wall.)  If your job winds up going longer than your set wall time, then slurm will automatically cancel your job even if it didn’t finish—so don’t underestimate.   The other important slurm flags are for “nodes” and “n-tasks-per-node”, which set how many nodes you want the job to use, and how many processors (cores) per node you want your job to use, respectively.  For Gaussian jobs, you always want to use nodes=1.  You can start with tasks-per-node=1, and then try and increase it up to 12 (the max for comet) to see if your calculation can take advantage of any of Gaussian’s parallel processing algorithms.  (You would also need to add a %nprocshared=8 line to the .gjf file.  It doesn’t always work that well, meaning your simply wasting processing time that we have to pay for.)

The commands at the bottom are bash linux commands that set up some important variables, including the stem of the filename for your Gaussian job file.  Eventually the script then loads the Gaussian module, and with the last line, submits your job.

If you’re using AMBER for molecular dynamics simulations, here’s a simple slurm script you can copy:

#!/bin/bash -l
#SBATCH -t 01:10:00
#SBATCH --job-name="amber"
#SBATCH --output="oamber.%j"
#SBATCH --error="eamber.%j"
#SBATCH --partition="compute"
#SBATCH --nnodes=1
#SBATCH --ntasks-per-node=1
#SBATCH --no-requeue
#SBATCH --mail-type=END
#SBATCH --mail-user=username@skidmore.edu

module load amber

ibrun sander.MPI -np 1 -O -i equil4.in -p 2mlt.top -c 2mlt_equil3.crd -r 2mlt_equil4.crd -ref 2mlt_equil3.crd -x 2mlt_equil4.trj -o mdout

The SBATCH commands do the same job of configuring slurm, though the “mail-type” and “mail-user” options show how you can have slurm email you when a job finishes. In this example, the last ibrun command is the one that actually runs AMBER (a sander job) and sets up all of its settings, input files, output files, and other necessities. Those must be changed for each new job.

Here is some specific information and examples for comet at the San Diego Supercomputer Center, as well as a complete list of all the slurm options you can use.

Leave a Comment

Filed under computing

How to Visualize Molecular Orbitals on GaussView

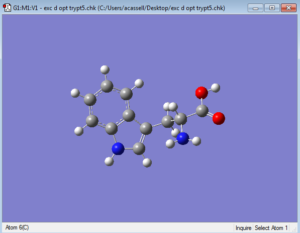
Open GaussView and click File->Open…, then open a checkpoint (.chk) files. After the GaussView image appears like below, click from the toolbar Results->Surfaces/Contours..

image (4)image (1)

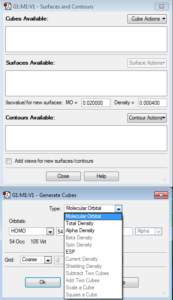
A new window will open. Select the Cube Actions dropdown and click New Cube. Make sure that the top “Type” dropdown is set to Molecular Orbital. Here, you can choose what type of molecular orbital you would like to illustrate (under the HOMO dropdown). For example, the options include HOMO, LUMO, Occupied, Virtual, or you can choose your own combination or molecular orbitals by number. Once you choose, click OK. Then, click the Surface Actions dropdown and click New Surface. This will add the MO’s to your GaussView image.

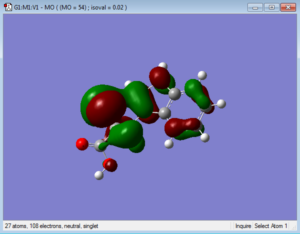
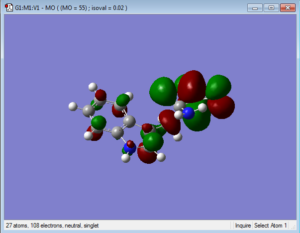
Below are representations of the HOMO and LUMO molecular orbitals of one conformation of tryptophan.

image (2)image (3)

Leave a Comment

Filed under chemistry

Using Putty and WinSCP to run molecular dynamics simulations on Influenza Neuraminidase 3BEQ

I first had to run a molecular dynamics simulation (via. workshop 1) to visualize the protein Influenza Neuraminidase 3BEQ. But before you can run a molecular dynamics simulation, you must know how to set up the simulation. Setting up the simulation and running the simulation wasn’t too bad. There is a learning curve when learning how to set up and run these simulations. All the errors I made when first trying to set up and run the simulation only helped me become better at the process.


I then had to run a molecular dynamics simulation (via workshop 2) to get the energy minimization and equilibration for the protein Influenza Neuraminidase 3BEQ. First time trying to run this simulation I encountered a road block, which was my own typos. Outside of the typos and making sure the input was perfect, I believe running these simulations was also not too bad. Errors also made me better at running this simulation.


Running these simulations through Putty introduced me to vim, which is a text editor. Vim allows you to edit a file in Putty. Learning Vim was not too bad also because of the Vim tutor that vim has. It teaches you the basics and everything I needed to know to successfully run the simulations.


The biggest thing I had to overcomer, for me, was to learn all these new features and remember how to use them. But once I surpassed the learning curve, It became progressively easier to get through the simulations.

1 Comment

Filed under computing

Python Script for Excited State Energy Calculations at Single-Point Geometries

I am in the process of writing a script in python to read Gaussian output files for single-point energy calculations and produce a text file of the energy values (ground state and six excited states) that can be opened in Excel. This will save me some time, since I am currently testing different combinations of functionals and basis sets with TDDFT in Gaussian, and I need to compare the results from many calculations to determine which combination is best. I am referencing a script written by Kristine Vorwerk. However, while Kristine’s script parses files with cclib and extracts the descriptions for energy values in addition to lambda max values, mine uses regular expressions and extracts only the energy values by themselves in an order I have predetermined. Like Kristine’s script, my script also extracts the method and basis set names and the job CPU time.

Another element of Kristine’s script that I have incorporated into my own is a brief interface on the command line that asks for the file path of the folder that contains the .out or .log files I want to read. The script will read every file of that type in that folder and create a text file in that same folder with all the results of interest. Unfortunately, testing the script on the command line can be a time-consuming and confusing process, since the command line itself does not show any error messages. To debug as I write, I am running my script through PyCharm, so I can see exactly where my code fails.

One of the biggest challenges of adapting this script from Kristine’s, and as a beginner programmer, I am unsure which functions requires cclib and which do not. As I move toward a finished script, I will rewrite many of her definitions and functions in a syntax that I am sure will work without cclib. Most of the adaptations rely of my knowledge of regular expressions. In particular, I am interested in ways that I could simplify parts of my code using loops. Since cclib uses simple functions to parse files, regular expressions should take more code to do the same job. However, I am finding that parts of my code look redundant and could probably be shortened using additional loops. For example, since I am looking for the same types of values for six excited states, my code has blocks such as:

mo1 = energyState1Regex.search(line)
if mo1 is not None:
    splitted = line.split()
    EEs1.extend(["  ", splitted[4]])
    absEEs1.extend(["   ", float(splitted[4]) + groundStateEV])

mo2 = energyState2Regex.search(line)
if mo2 is not None:
    splitted = line.split()
    EEs2.extend(["  ", splitted[4]])
    absEEs2.extend(["   ", float(splitted[4]) + groundStateEV])

mo3 = energyState3Regex.search(line)
if mo3 is not None:
    splitted = line.split()
    EEs3.extend(["  ", splitted[4]])
    absEEs3.extend(["   ", float(splitted[4]) + groundStateEV])

….

etc. within a loop, scanning each line for the regular expressions which indicate the different excited states. I could probably shorten this code with another loop, but I am still thinking about how to do that. I cannot use a loop to change one character in a variable name (e.g. mo1, mo2, etc.), so I may need to change the way my regular expressions search for the data I want. Kristine found a simple solution for that problem a while ago, but I believe that was for a list that could be indexed. Nonetheless, I may look at her latest script that uses regular expressions to see if she has found any ways to simplify the code I am writing, and whether that script may be a better reference for me to use.


cclib webpage

PyCharm webpage

2 Comments

Filed under chemistry, computing